Several tips and tricks are available for Gmail or Google Workspace users, helping them to recover some of their precious time! So, how to become a Gmail power user.
Familiarize yourself with advanced features like filters, labels, and keyboard shortcuts. Organize your inbox, employ search operators for efficient searches, and utilize labs and extensions for enhanced functionality. Stay updated with Gmail updates and consistently optimize your email management for productivity.
In this guide, I will explore deeply into these features, enabling you to unleash the full capabilities of Gmail.
How to Become a Gmail Power User
I won’t merely unveil a new Gmail feature; I’ll also guide you on optimizing its usage. Let’s begin.
1# Master Crucial Gmail Keyboard Shortcuts
To enhance your efficiency while using the web version of Gmail, it’s essential to become proficient in fundamental shortcuts, including the following:
Shortcut | Action |
|---|---|
p | Previous message in an open conversation |
n | Next message in an open conversation |
Ctrl + b | Bold |
Ctrl + i | Italics |
Ctrl + u | Underline |
e | Archive |
# | Delete |
! | Report as Spam |
r | Reply |
a | Reply All |
f | Forward |
You can access a comprehensive list of Gmail keyboard shortcuts on the official Help site.
2# Un-send Your Email
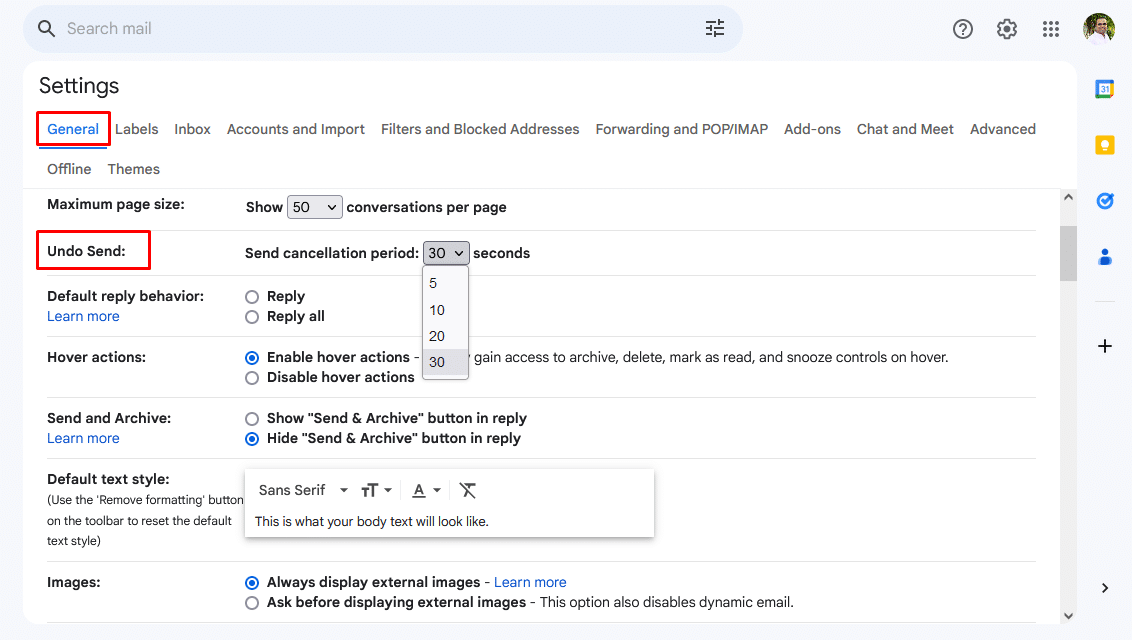
Navigate to the Settings section and locate the General tab. Here, you’ll discover the “Enable Undo Send” option.
Once activated, you’ll have a window of up to 30 seconds, during which you can select “undo send” for any email you’ve dispatched.
The email won’t actually be sent initially, ensuring it never reaches your recipient’s inbox. This is one of those valuable Gmail tips I wish I had discovered earlier!
3# Set a Timer for Your Emails to Self-delete
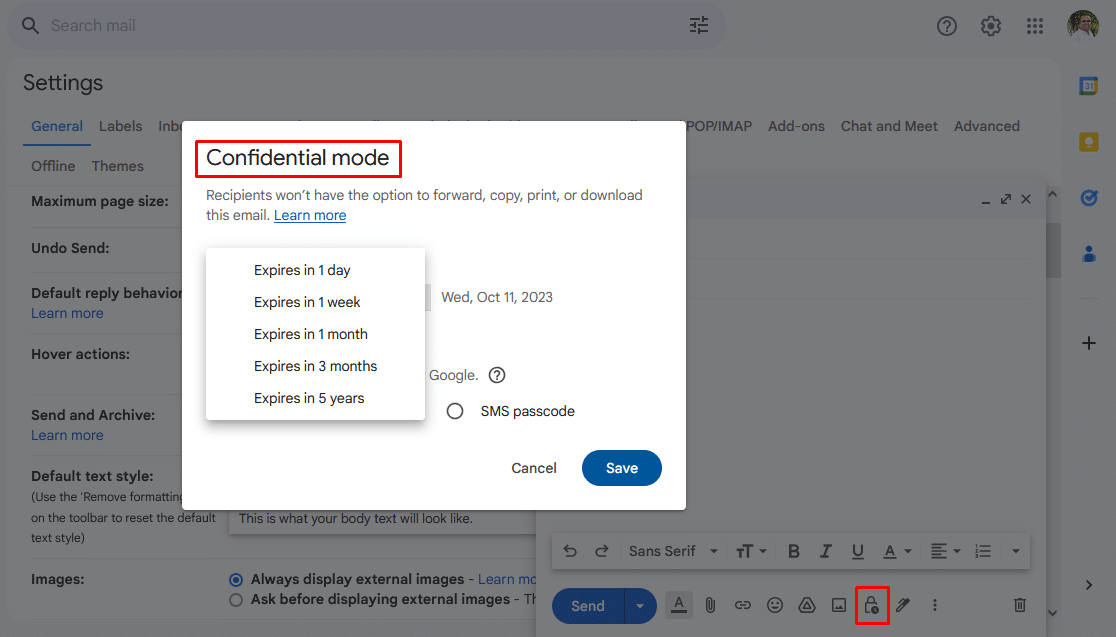
You can dispatch emails that will automatically vanish after a designated period.
Moreover, recipients cannot forward these emails, making them ideal for situations requiring the utmost security and exclusivity for your message.
To send an email that self-destructs, begin by creating a new message. Then, locate the icon resembling a padlock with a clock near the “Send” button. This icon activates or deactivates “confidential mode.”
4# Send an email requiring recipients to complete a 2-step verification process before accessing its contents

For enhanced security measures, utilize “confidential mode” to activate 2-step verification for the emails you transmit. This necessitates the recipient to input a code delivered via SMS to their mobile device as a prerequisite for viewing the email.
5# Turn-off Email Snippet Previews
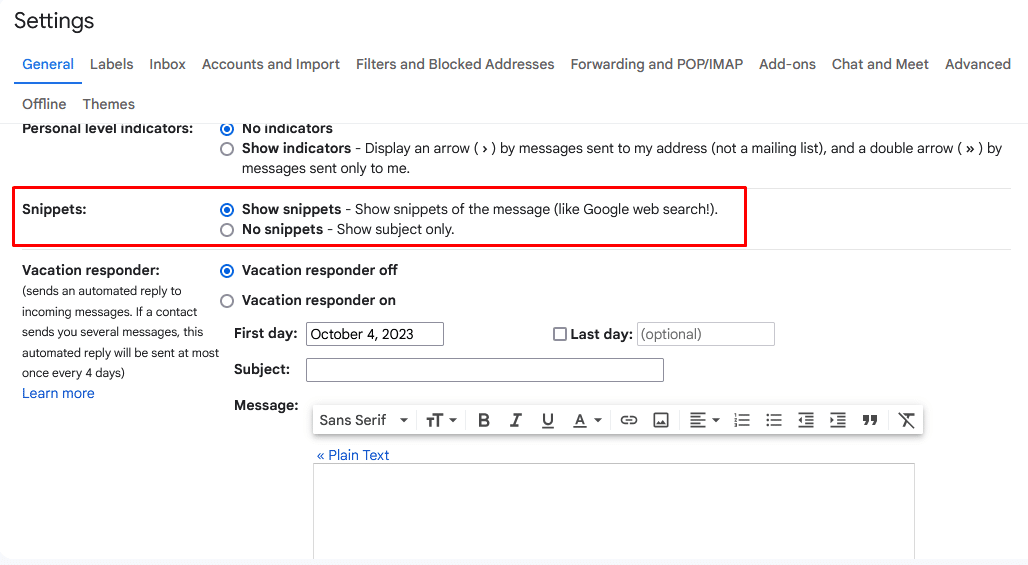
By default, Gmail typically shows snippets below the subject line in your inbox view. If you’d like to turn off this feature, you can easily do so within the General Settings section.
6# Use a single Gmail inbox to register for a particular service multiple times.

Here’s a fascinating Gmail hack: Google disregards any periods (.) and plus signs (+) within a Gmail email address.
In simpler terms, variations such as gmailuser@gmail.com, gmail.user@gmail.com, gmail+user@gmail.com, and g.m+a.i+++lus…e.r@gmail.com will all route to the identical gmailuser@gmail.com email address.
One highly practical application of this technique is establishing multiple social media accounts using a single email address.
7# Pause Your Gmail Inbox

Inbox Pause is a Gmail plugin that adds a “pause” button to your inbox. Clicking it temporarily halts the arrival of new emails in your inbox.
Click it again to “unpause,” and all the emails you received during the pause will instantly appear in your inbox.
This feature is particularly useful for maintaining focus on your tasks without succumbing to the temptation of constantly checking your inbox each time a new email arrives.
8# Remove the “Social” and “Promotions” tabs

Gmail typically displays three primary tabs in your email inbox: Primary, Social, and Promotions. I prefer consolidating all incoming emails into a single tab and opting out of Google’s algorithmic email categorization.
If you are also like me, you can remove these tabs by navigating to Settings, selecting “Configure Inbox,” and then uncheck the boxes next to “Social” and “Promotions.”
9# Incorporate a previous email into your reply.
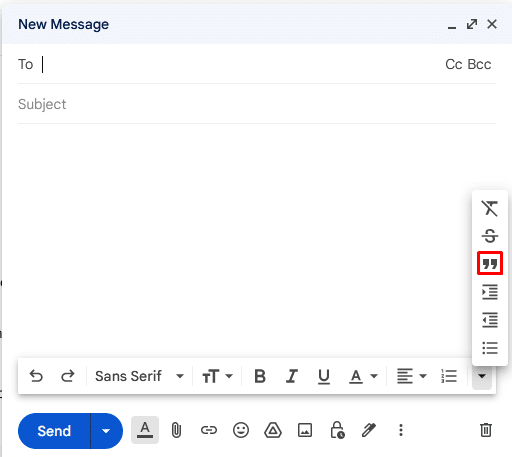
When addressing various points from a previous email, you can conveniently achieve this using the “quote” feature in the formatting toolbar.
10# Authorize another person to access your Gmail account without disclosing your Gmail password.
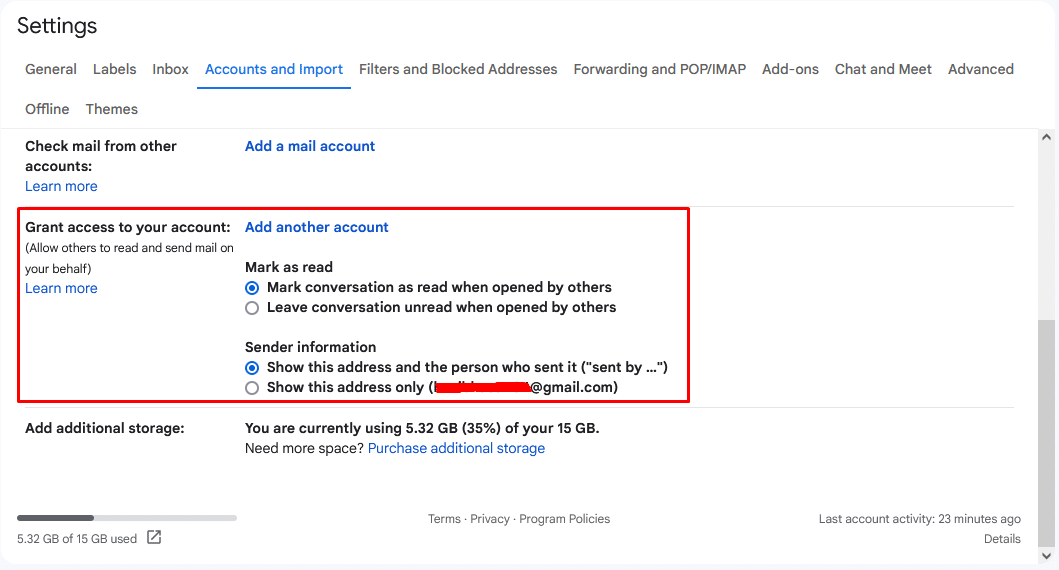
If the need arises to provide Gmail access to another individual, you can accomplish this by appointing them as an account delegate.
This proves particularly helpful if you plan to go on vacation or anticipate an extended period without email access (check our guide on out-of-office message examples if you’ll be away for an extended duration).
Instructions for configuring and revoking account delegates can be found here.
11# Separate threaded email “conversations” into individual messages.

Gmail automatically groups emails into threads by default. If you prefer to view new emails separately, without them being bundled into the same thread, you can achieve this by deactivating the “conversation view” in your Settings.
Enhance your email organization with labels.
This Gmail tip is designed to boost your email management. Locate the “create new label” option on the left side of Gmail, and give your new label a name. It will instantly appear in your list of labels and categories, allowing you to easily assign emails or threads to this label for efficient organization.
12# Add a color to your stars.

While using stars and “important” markers is an excellent initial approach to streamlining your Gmail organization, you can elevate it by incorporating colored stars and other symbols. Visit the General Settings tab to select your preferred options and begin implementing them.
13# Enhance inbox tidiness with Gmail’s automatic filtering.

If you find yourself subscribed to numerous newsletters, social media notifications, task management updates, or other sources of daily emails, this Gmail technique can significantly declutter your digital life. Harness Gmail filters to categorize emails into specific folders or labels.
This approach is valuable for diverting specific emails from your primary inbox, such as setting up a rule to automatically route all Groupon emails to a dedicated “Groupon” label. To get started, access Settings and then navigate to the “Filters and Blocked Addresses” tab, where you can create filters based on criteria like email address, subject line, and various other identifiers.
14# Access Gmail even in areas with sluggish internet connections.

Gmail offers an option designed for regions with slow or unreliable internet connections, known as “HTML mode.”
If you wish to try, click on this link (you’ll receive a prompt to confirm the switch to HTML mode). Once activated, Gmail will load without its typical additional features, providing you with essential tools for composing and sending emails.
This feature proves highly beneficial when working in places like Starbucks, airports, or areas with unreliable public Wi-Fi.
15# Embed images within your email for a more seamless display.
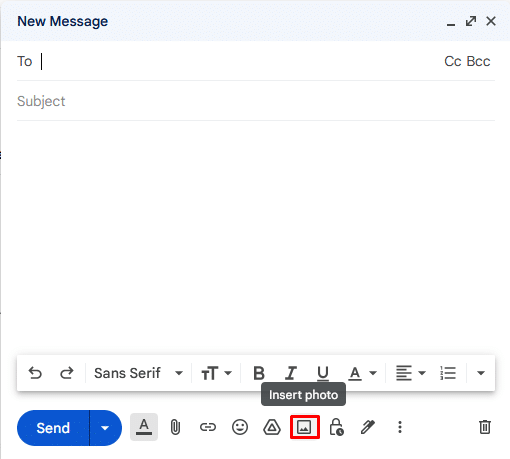
Frequently, it’s advantageous to incorporate a screenshot or image directly into an email rather than sending it as an attachment. However, accomplishing this in Gmail may take time to become apparent.
Fortunately, it’s a straightforward procedure. Just click on the small photo icon near the “send button” to effortlessly insert an image into your email.
16# Explore stars as an additional organizational tool.
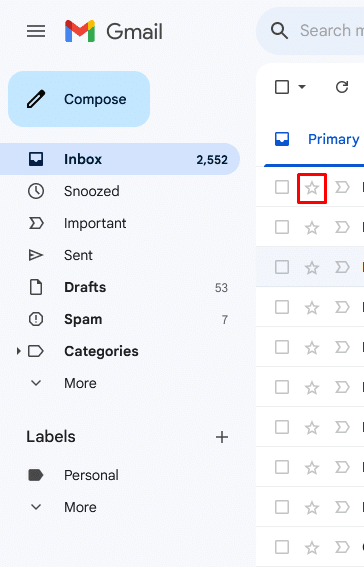
While it may seem basic, incorporating stars and “important” markers can remarkably enhance your Gmail organization. If you haven’t already, give them a shot!
17# Use Gmail search operators to fine-tune your searches.

Within Gmail, you can access a range of advanced search operators that can significantly enhance the precision of your searches. This proves invaluable when you need to locate a crucial thread, reconnect with a client from the past, or pinpoint emails within specific date ranges.
Mastering these Gmail search operators ranks among the top Gmail tips on this list, as it can significantly amplify your daily productivity.
18# Effortlessly attach an email signature to every outgoing email.
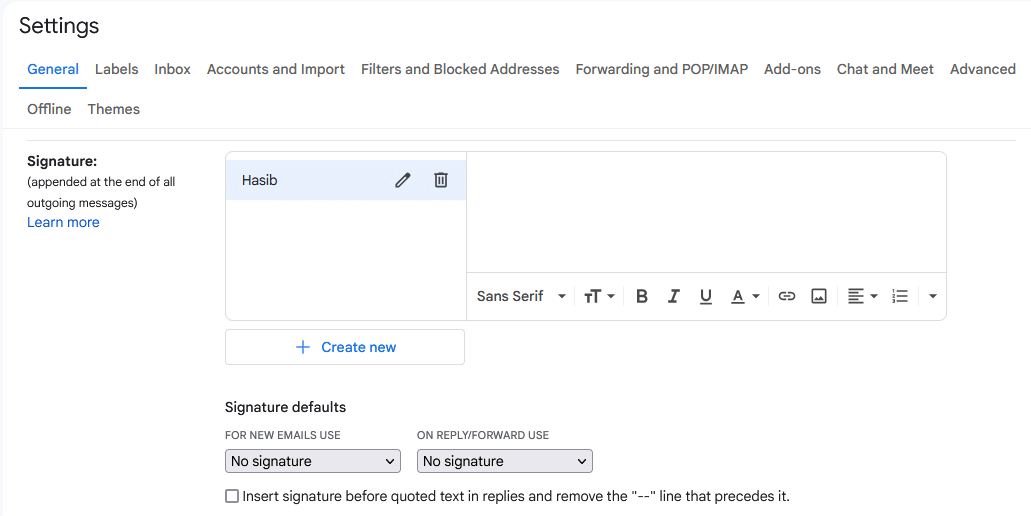
Email signatures offer an excellent avenue for promoting your website or social media profiles while providing recipients with your contact details in a user-friendly format.
To include an email signature, navigate to Settings, choose the “General” tab, and then scroll down to the “Signature” section.
19# Customize the number of emails displayed in your inbox to your preference.
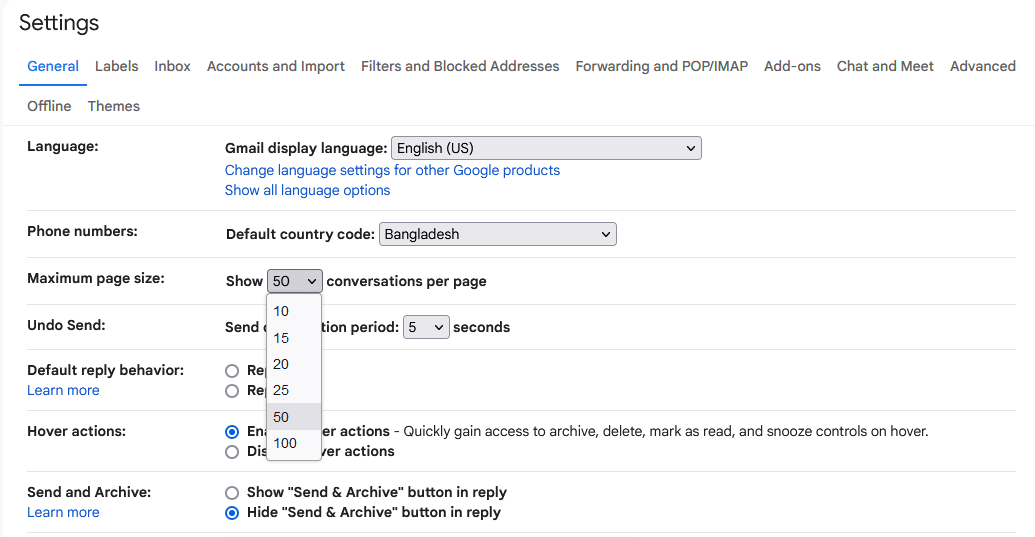
To adjust the quantity of email threads visible in your inbox, visit the Settings section, go to the General tab, and scroll down to the “Maximum page size.” Modify this setting to align with your preferred viewing arrangement.
20# Designate emails as unread, even if you’ve already reviewed them.

This Gmail tip is a personal favorite of mine, as I often use my inbox as a to-do list. Unread emails symbolize pending tasks for me. Therefore, if I’ve perused an email that demands action I can’t address immediately; I mark it as unread so I can revisit it later.
To mark emails as unread, click on the three dots at the top of Gmail and then select “Mark as unread.”
21# Mute ongoing discussions

Do you ever wish you could put an end to email notifications from a thread where you’re merely CC’d, and the conversation isn’t particularly relevant to you? Well, you can do just that! Open the thread you’d like to mute, click on the three dots at the top, and select “Mute.”
This is another one of those Gmail tips I wish I’d discovered earlier!
22# Automate email categorization as they arrive
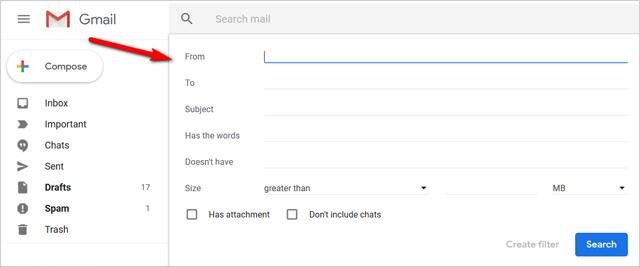
You can streamline your email organization process by using Filters to automatically sort emails into distinct categories and labels that you’ve set up, sparing you from the manual effort.
For instance, if you want all emails from a specific client to be filed under the “Client X” folder, you can establish a rule to achieve this automatically.
You can create filters based on email addresses, keywords, and other criteria and even block specific email addresses altogether.
23# Include bullet points, numbered lists, and various formatting styles in your emails.
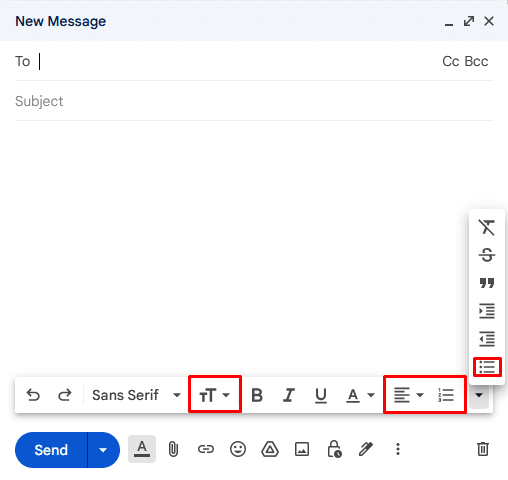
Utilizing text formatting is among the most effective methods to convey professionalism when communicating via email.
Additionally, it aids in minimizing instances of miscommunication by organizing thoughts, action items, and other critical information.
If you still need to explore these formatting techniques, try them!
24# Access Gmail even without an internet connection

Gmail offers an “offline” mode that allows you to read and compose responses to emails received while connected to the internet.
Once you regain Wi-Fi connectivity, your responses will be sent automatically. You’ll need to install a free Chrome app to use this feature.
25# Open multiple Gmail accounts as separate tabs within the same browser window
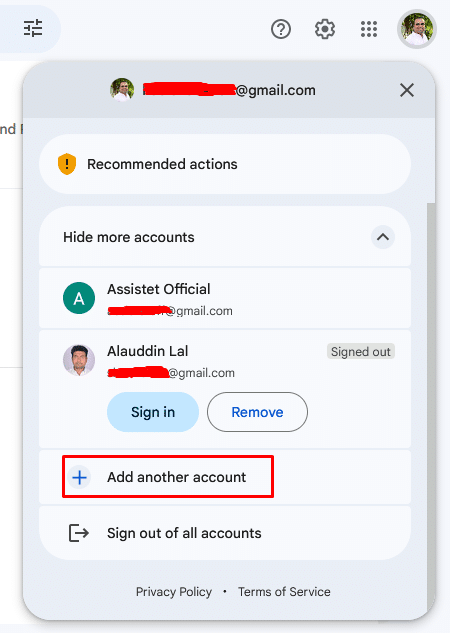
If you need to keep an eye on several Gmail accounts concurrently, whether work-related or a combination of personal and professional email addresses, you can easily achieve this by clicking on your profile picture in the upper-right corner of Gmail and selecting “Add account.”
Choose the desired account, which will open in its distinct browser tab.
26# Prioritize specific emails to appear at the top of your inbox consistently.
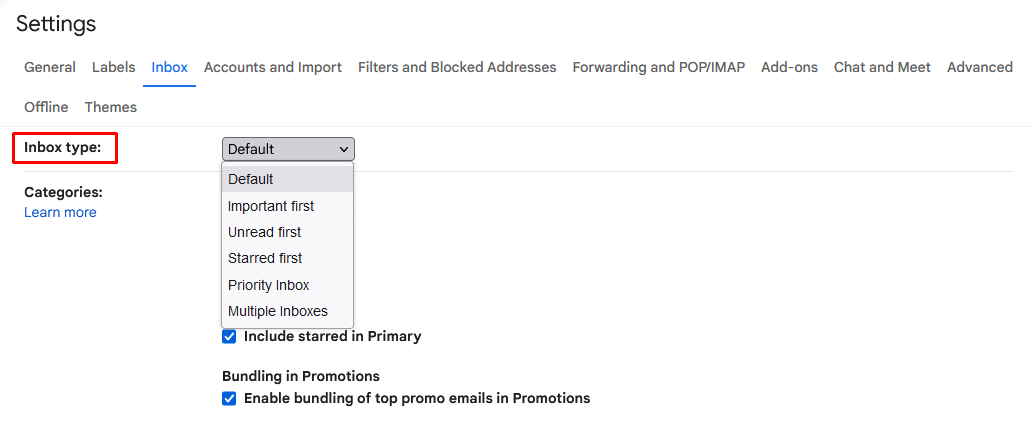
When glancing at your inbox, having the most crucial messages prominently displayed is often preferable. You can configure this by adjusting a Gmail setting.
Head to the Settings section, click the Inbox tab and locate the “Inbox Type” drop-down menu.
I find the “Unread first” inbox setting most effective. It’s one of the Gmail tips I highly recommend if you prefer to use your inbox as a task list, as I do.
Create customized Gmail keyboard shortcuts.
If you want to establish your own Gmail keyboard shortcuts, you have the flexibility to do so!
27# Automatically advance to the following email.

If you wish to expedite your morning inbox routine, you can activate “Auto-advance” within the Settings section in the “Advanced” tab. With this feature enabled, the next one in your inbox will automatically appear whenever you archive, mute, or delete an email.
This Gmail tip may seem like it could be more time-saving individually, but when applied to hundreds or thousands of emails, the accumulated time saved can be significant.
28# Create email templates for swift responses.
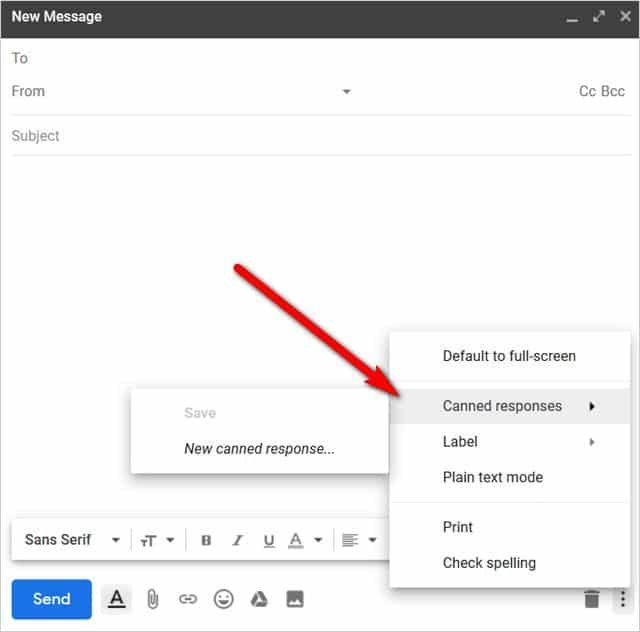
If you frequently compose similar responses, such as answers to common inquiries, Gmail’s “canned responses” feature can be a valuable asset. Enable it within the Settings section under the Advanced tab.
Once activated, you’ll notice a sub-menu in your compose window (located near the trash icon) with the option for canned responses. Here, you can save new canned responses and easily insert previously saved ones into your emails with a single click.
29# Preview emails without opening them.
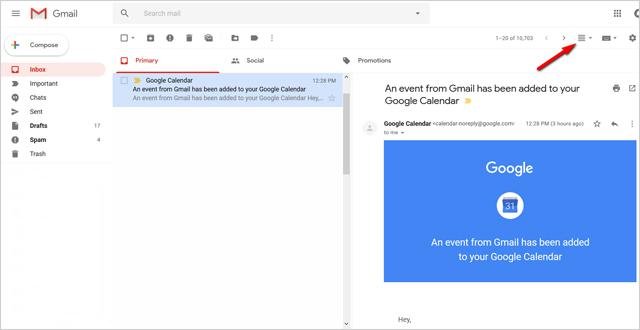
Gmail offers a feature known as the Preview Pane, which functions similarly to the familiar left-right message format in Outlook. The right-side pane previews the email’s content without officially opening it, allowing you to quickly review emails without fully opening them.
FAQ
The nearest equivalent to an official manual is the Gmail support page, which addresses numerous subjects. Numerous online articles, such as this one, explain how to utilize Gmail and explore its advanced functions.
Using Gmail like a pro involves leveraging some of its more advanced features, such as email filters, labels, and more.
Conclusion
Hopefully, all your queries regarding how to become a Gmail power user are answered in this comprehensive guide.
The Gmail tips mentioned above will empower you to maximize your Gmail experience. Remember, no tool can enhance your productivity more than self-discipline.
Therefore, consider seizing the day using these Gmail productivity tips, you can become a power user effortlessly.